How to setup a Minecraft server on the Raspberry Pi 4
In this tutorial, I will be showing you how to setup a Minecraft server using a Raspberry Pi 4.
The short answer
In the terminal run the following commands:
- sudo apt install default-jdk
- cd
- mkdir minecraft
- cd minecraft
- wget https://launcher.mojang.com/v1/objects/1b557e7b033b583cd9f66746b7a9ab1ec1673ced/server.jar
- java -Xmx1024M -Xms1024M -jar server.jar nogui
- You will see an error. This is okay, proceed to the next step.
- sed -i ‘s/eula=false/eula=true/’ eula.txt
- java -Xmx1024M -Xms1024M -jar server.jar nogui
Installing the Java JDK
In order to run the server (which is a java jar file), you will need to install Java on the Raspberry Pi as it does not come by default. This can be done by simply running the command below:
sudo apt install default-jdkInstalling the Minecraft server
Now that Java has been installed. Let’s create a folder to put the Minecraft server files into. You can create a new folder using the mkdir command:
cd
mkdir minecraft
Now navigate to the minecraft folder:
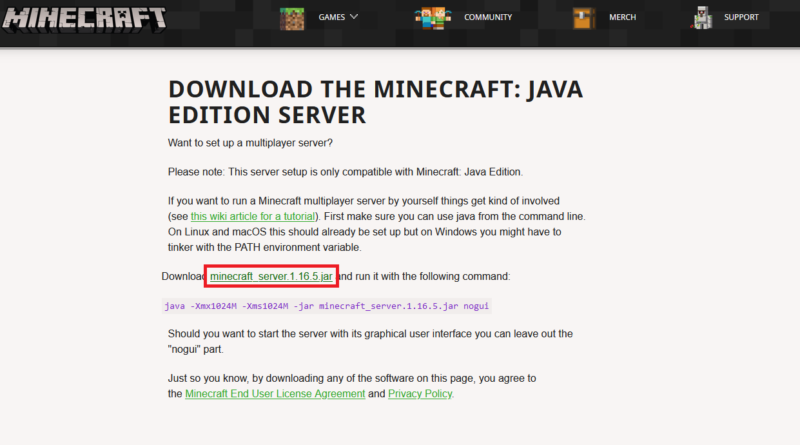
cd minecraftNow, it’s time to get the Minecraft server file. To do this navigate to https://www.minecraft.net/en-us/download/server/, find the link to the jar file (highlighted below), right-click and copy the link:
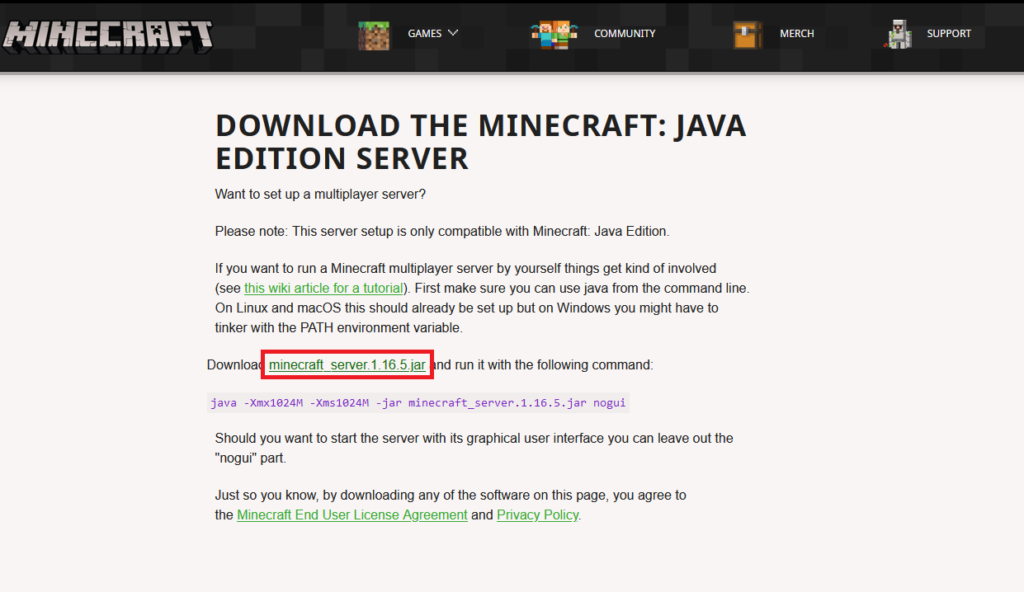
Go back to the terminal and type wget and paste the URL e.g:
wget https://launcher.mojang.com/v1/objects/1b557e7b033b583cd9f66746b7a9ab1ec1673ced/server.jarThis command will download the jar file needed to run the minecraft server. Once this is done, you will need to run the jar file:
java -Xmx1024M -Xms1024M -jar server.jar noguiAfter doing this you will likely see the following error:
[22:51:11] [main/ERROR]: Failed to load properties from file: server.properties
[22:51:11] [main/WARN]: Failed to load eula.txt
[22:51:11] [main/INFO]: You need to agree to the EULA in order to run the server. Go to eula.txt for more info.
This is expected. To fix this error, run the following command to agree to the End user License Agreement (EULA):
sed -i 's/eula=false/eula=true/' eula.txtGo ahead and restart the server:
java -Xmx1024M -Xms1024M -jar server.jar noguiThe error should be gone and the Minecraft server will start:
[22:55:07] [main/INFO]: Environment: authHost='https://authserver.mojang.com', accountsHost='https://api.mojang.com', sessionHost='https://sessionserver.mojang.com', servicesHost='https://api.minecraftservices.com', name='PROD'
[22:55:10] [main/WARN]: Ambiguity between arguments [teleport, destination] and [teleport, targets] with inputs: [Player, 0123, @e, dd12be42-52a9-4a91-a8a1-11c01849e498]
[22:55:10] [main/WARN]: Ambiguity between arguments [teleport, location] and [teleport, destination] with inputs: [0.1 -0.5 .9, 0 0 0]
[22:55:10] [main/WARN]: Ambiguity between arguments [teleport, location] and [teleport, targets] with inputs: [0.1 -0.5 .9, 0 0 0]
[22:55:10] [main/WARN]: Ambiguity between arguments [teleport, targets] and [teleport, destination] with inputs: [Player, 0123, dd12be42-52a9-4a91-a8a1-11c01849e498]
[22:55:10] [main/WARN]: Ambiguity between arguments [teleport, targets, location] and [teleport, targets, destination] with inputs: [0.1 -0.5 .9, 0 0 0]
[22:55:10] [main/INFO]: Reloading ResourceManager: Default
[22:55:16] [Worker-Main-4/INFO]: Loaded 7 recipes
[22:55:19] [Worker-Main-4/INFO]: Loaded 927 advancements
[22:55:27] [Server thread/INFO]: Starting minecraft server version 1.16.5
[22:55:27] [Server thread/INFO]: Loading properties
[22:55:27] [Server thread/INFO]: Default game type: SURVIVAL
[22:55:27] [Server thread/INFO]: Generating keypair
[22:55:29] [Server thread/INFO]: Starting Minecraft server on *:25565
[22:55:29] [Server thread/INFO]: Using default channel type
[22:55:29] [Server thread/INFO]: Preparing level "world"
As you can see above, this Minecraft server has been started on port 25565:
[22:55:29] [Server thread/INFO]: Starting Minecraft server on *:25565Connecting to your Minecraft server
Now that your Minecraft server is running, it is time to connect to it! To connect, you will need to know 2 things; the IP address and the port. You should be able to see the port from the logs above. To get the IP address, open a new terminal and type the following command:
ifconfigIf you are connected to WIFI, look for the wlan0 adapter otherwise, if you are connected by Ethernet cable, look for etho0. Both sections should have an inet value. E.g:
wlan0: flags=4163<UP,BROADCAST,RUNNING,MULTICAST>  mtu 1500
        inet 192.168.2.94  netmask 255.255.255.0  broadcast 192.168.2.255
        inet6 fe80::3a56:d8c0:65d5:5d58  prefixlen 64  scopeid 0x20<link>
        ether dc:a6:32:cf:eb:43  txqueuelen 1000  (Ethernet)
        RX packets 273199  bytes 354710843 (338.2 MiB)
        RX errors 0  dropped 0  overruns 0  frame 0
        TX packets 131044  bytes 12432186 (11.8 MiB)
        TX errors 0  dropped 0 overruns 0  carrier 0  collisions 0
You can see from my configuration my IP is 192.168.2.94. This is your local IP and you should use this to connect to your Minecraft server.
And that’s it! Now you should know how to setup your own Minecraft server on the Raspberry Pi 4 and connect to it!
Interested in how to play all of your favourite old classic games? Check out this tutorial to see how you can install RetroPie on the Raspberry Pi!